Creating kitchens and baths for finicky customers since 1993


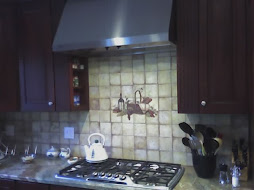
backsplash features inset metal tiles for accent and texture
Showing posts with label DIY Tile Pics. Show all posts

Sunday, July 15, 2012

Fresh pictures posted on Featured Projects page -- your feedback welcome!


by Jim Bessey

accent tiles in wall band and niche jazz up tan tile surround
This tan tile was almost boring -- until we added the accent tiles!
With a light rain falling this morning, today was a fine day for digging through my photo archives. I've been meaning to post new pictures on the Featured Projects page, but had kept being sidetracked by other, more pressing, deadlines.

Trouble is, even though I don't take dozens of pictures from each job, I've still accumulated hundreds of photos without any helpful organization. So I had to do some organizing. First I backed up a big batch of work pics, then I began slashing.

Two pics too similar? One of them had to go. Overexposed? Gone. Boring? Delete. I fixed and lightened and cropped and shuffled folders, renaming both folders and images so the names made sense--not just dates and job names.

While I was doing that, I put together three CD's with assorted images for Scott Bacon, at McKenna's Rochester Kitchen & Bath, the company I do remodeling work for. He's been polite about asking me for the past few weeks. Now I can finally hand him something useful.

So I've added a variety of interesting tile project pics to that long-neglected page, too, finally. I'll keep going, now that I can see what's what. Have a look, and if you see something you like (or hate?) please do leave a Comment here. Thanks!
_______________________________________________
If you have tile project pictures or helpful project advice you'd like to share, please leave a Comment here or contact me directly. ~Jim

Saturday, October 23, 2010

DIY Tile Pic of the Week: Tile Shower Base

By Jim Bessey, editor

When you want an all-tile shower enclosure, there's no substitute for the real thing and no shortcuts to great results. 

2 by 2 porcelain tiles imitating an earthy "wood" look make a great pattern
Most of our ceramic tile shower remodeling projects use some type of high-end precast base, rather than real tile as pictured here. Why? Because forming and installing a ceramic or porcelain tile shower base is a real pain in the behind. Not only that, it's very easy to make a crucial mistake that will be very difficult to address when the inevitable leak emerges days or weeks later.

On the other hand, none of those expensive cast bases can even attempt to imitate the beauty of an all-tile base. Unfortunately, the best way to achieve results like this uses methods alarmingly similar to those of the original Roman Spa builders. A good DIY tile project? Not really; but if you're patient and aren't afraid to work with water-proof membrane, mortar mix, thinset, and ceramic (or porcelain) tile -- well, it's a job you can do one step at a time, carefully. 

We'll talk about that process in a future column. I've included a number of more basic DIY Tile Tips in earlier posts.
 _______________________________________________


What tile projects have you tried? Your ideas for future posts and pictures are always welcome. For more tile information, see my DIY Tile Zone, hosted on Helium.

Saturday, June 05, 2010

Adventures in tub tile: Fun with shapes and accent pieces

Photo by Jim Bessey
tile tub surround uses FOUR tile types!
Four distinct tile sizes and types combine for a stunning design
 Late last fall we tackled a tricky bathroom filled with interesting tile, including the tub surround pictured above. The central design uses 13"-square porcelain tiles with some rather aggresive shading and swirling. The designer added the same selection in a 6"-square for accent, then went even farther by including a gold-metallic border rope surrounding a 2-by-2 mosaic band. Next, above that accent band is the final touch -- the same 6-by-6 tiles laid diagonally.

Is this design too busy for your eye? The homeowner loved it, and was pleased with my attempts at both random and small-pattern layout. This is demanding work, using so many sizes and placements of different tiles in the same small area. You have to be careful doing this sort of design because you know that people will be looking closely every time they shower! (One of the 6-by6 tiles actually had to be chiseled out and replaced due to a minor but noticeable spacing issue -- that wasn't fun at all.)

Photo copyright 2010 Jim Bessey * Reprints with attribution, unaltered.
_______________________________________________
Want to know more about ceramic and porcelain tile for floors, walls, tubs and showers? See my DIY Tile Zone hosted on Helium.com

Friday, June 04, 2010

Bathroom floor tile adventures: "I see patterns ... everywhere?"

Forming floor tile patterns can be risky business --

Our customer's initial response was "rip it all out!" I'm not kidding. Then the homeowner thought about it overnight. This bold pattern was permitted to stay put.

12x12 floor tiles in pattern
Rarely does a ceramic or porcelain floor tile lend itself to pattern-forming as well as this one. A large majority of installations call for careful randomizing (which certainly does sound like an oxymoron). Most tile instructions insist upon box-mixing and random rotation of each tile, or conversely require that the tiles maintain a given orientation specifically to avoid patterns.

close-up of floor tile pattern
tiles combine light and dark shading
This tile was different. It's shading and pigment variation was so pronounced that it was easy to visualize a wild assortment of pattern-matching. My design may have started accidentally, but once my eye saw a way to create floor-art I had to keep going. Of course there was an inherent risk in laying the tile artistically -- the homeowner was dead serious in his original dislike of the results.

zoom-in on floor tile pattern
closer view of 8-tile pattern
Notice that it took eight full tiles to form the base image for this floor. That's a lot of tedious tile selecting. Then, in order for the concept to "work" I had to keep going -- a similar yet complementary image is formed to the left, and is partially covered by the toilet and vanity. However, if there had not been a way to continue the theme, I'd have had to abandon the idea.

I'm not sure how well this earthy sandstone tile would have looked "randomized." With such enormous variation and contrast in tone it would be tough to achieve something that looked 'unplanned.' Some of these tiles actually display a mirror-image of another tile -- a visual stunt that can ruin any attempt at non-patterned designs.
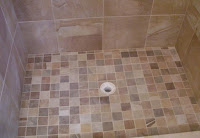
shower tile floor and walls checker-board
Large & small tiles using random mix
One of our more recent tile jobs also used an extravagantly-varied tile surface; each tile seemed to have 'grain' and this had to be taken into account. In this case, we all agreed it was important to use two methods to randomize the overall tile image -- we used 'checker-boarding' and made sure that similar tile faces were never adjacent (which might sound easier than it is in practice). Notice how crucial the lack of patterning becomes for the 2x2 shower floor tiles.

Whether your floor tile lends itself to patterning or not, it's always smart to mix boxes and dry-set a large area just to see how the finished work will look. This is also an easy way to double-check your intended layout for cutting or other visual problems. Good planning makes for great results.

copyright 2010 - all rights reserved * photo reprints with attribution, unaltered
 _______________________________________________
Would you have insisted on having the patterned design removed? Would you even consider buying a tile with this much variation in shading? How do you like the wood-look tiles, laid in a checker-board pattern -- too eye-boggling? 

If you'd like to learn more about home tile applications, have a look around at the DIY Tile Zone hosted on Helium.com. See also:  A Hard Look At Ceramic Tile.: An article from: Flooring
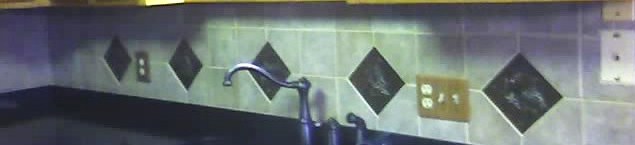
Thursday, June 03, 2010

Tile tub surrounds: Finding your niche

Tub surround tile niches are cool, and each is unique.

Niches are formed using an opening in the wall, a manufactured metal "pan," and a variety of tiling methods to blend with or accent the rest of the tub-area tile work.

Why choose a niche, versus other types of soap dishes and shelving? Design and aesthetics give niches the first-place vote. They do not intrude on the tub's space, and they don't interrupt the flow of the tile the way corner shelves do.

On the other hand, a niche adds substantial cost to the job -- mostly in added labor. One niche can easily add an entire day's work to a five-day job. There's extra time spent on careful layout, more time in cutting and re-framing the opening, hours more added for tile cutting (usually more than 20 added cuts!), and more time lost while grouting and caulking. It all adds up; but the pay-off is so high... well, just look at these pictures!


elegant tile niche

Simple and elegant: this one combines a partial picture-frame effect with interior bullnose finish, all using the same tile selection and carrying layout lines cleanly through the niche. For accent, this homeowner designed a band of two-by-two tiles just above the niche frame.

basic tile niche

Even simpler: this niche displays no picture-frame effect and blends beautifully with the surrounding tile. Notice how the grab bar aligns perfectly with the centered niche.

fancy tile niche

Jazzy and artistic: one of our most recent, this is also the most complicated. It uses a double-picture-frame design and adds smaller accent tiles in the back wall for an eye-popping finished product. The accent band above the niche uses a third ribbon-tile of the same finish.

modified niche design

Blending styles: our final example uses a modified picture-frame with a 'window sill' effect, and also includes accent tiles applied to the back wall. Notice the matching band of these same accent tiles at eye level. The accessory you see below the niche is a preformed corner seat.


Tiling a tub surround and adding an integral niche is typically beyond the skills of do-it-yourselfers.

When you're contracting professionals to do a job like this, however, it's nice to know you have plenty of choices. In addition, once you have an idea of the extra work involved, you might not be quite as easily shocked at the prices quoted. Keep in mind that a tile niche can be expected to last 30 to 50 years, same as the rest of the tiling in your remodeled bathroom.

All photos copyright 2010 by dzyne -- reprint with attribution please. _______________________________________________
Which niche looks best to you?  Do you prefer the simplistic approach, or like it better when the niche becomes a design focal point?

If you've had your bathroom remodeled using ceramic or porcelain tile and would like to share a picture of it here, please contact me via comments or my email link. If you'd like to learn more about tile topics, see our companion DIY Tile Zone hosted by Helium.com.

Saturday, February 13, 2010

Tumbled marble makes a magnificent backsplash tile choice

tumbled marble tile backsplash
Tumbled marble tiles, natural stone cut to 4" by 4" squares, pre-sealed for easy handling.

Henrietta NY: A kitchen customer recently updated her ugly old laminate counter tops to natural granite. She called us in to add the finishing touch -- a gorgeous tumbled marble backsplash. These little squares add a warm, distinctive look without any need for fancy borders or decorative inserts.

Tumbled marble is natural stone, cut to size and softened by abrasion. They are supplied pre-sealed for easier grouting and a longer-lasting luster. Every tile is distinct, though many are similar. Patterns emerge randomly, creating real eye-appeal effortlessly.

natural marble tile backsplashInstallation is a breeze, with careful layout preparation. We used the same tiles at the edges as for the rest of the field, simply choosing best-quality pieces for borders. Before beginning, we mixed all boxes randomly to ensure smooth blending. We used 3/16" spacing for sanded grout.

Marble tiles have to be cut with a diamond blade, typically water-cooled. These are fragile because of natural veins within the stone itself, so sometimes they just break. That's one of the reasons it's important to order a couple of extra square feet. We had THREE full tiles left over when we finished.

Our customer was thrilled with the finished product. She was concerned about blending granite and marble in the same space, and rightfully so. As you can see, each complements the other nicely. The two natural products provide a rich, yet earthy tone that doesn't overpower the room. This job took less than two full workdays, keeping the labor well under $1,000.

Reprints available on request.
_______________________________________________

For many homeowners, a tile backsplash makes a great DIY tile project. It's a small area, and one that doesn't disrupt your life the way a new floor might. Preparation for wall tiles is also less extensive than what's required for floors.

For more DIY tile information, please visit Jim's DIY Tile Zone hosted by Helium.com.

Tuesday, March 17, 2009

DIY Tile Pic of the Week: Find your tile niche

A custom tile niche evokes classic Roman charm in a bathroom.

custom tile niche When you choose tile for your bathtub or shower makeover, you might want to consider including a classic tile niche. This is not a project for the uninitiated! However, for design harmony and beauty, it's hard to beat.

The project shown used 12" by 12" porcelain tile, 3/8" thick -- not an easy tile to cut or install. Choosing a smaller, thinner ceramic tile reduces the level of difficulty significantly.

Typical "soapdish" accessories are single molded ceramic or "cultured marble" items that you purchase and install. This usually involves cutting two to six field tile (the standard tile used) to fit around the installed fixture. You might have to cut a hole in the wall and use some silicone caulk; but that's usually the extent of it.

As you can see from the image, a tile niche demands far more cutting, fitting, and finish (grouting) finesse. This fixture took the place of four 12 x 12 field tiles; each of these had to be carefully cut (last) to fit around the indented area. All tiles used in the niche follow the grout lines for the containing wall. Notice how critical the placement of the niche within the field tile is, in this case.

Add them up, then: there are 24 distinct cut tiles used in this installation. (That's more than 24 cuts, since some tile pieces required two cuts.) The picture-frame border you see was composed of bull-nosed edging tiles, with the eased edge facing inward. This prompted eight mitered cuts which had to be carefully fitted.

Grouting an inset tile fixture is more difficult than finishing around a protruding soapdish, too. More care has to be taken with the original fit and with the grouting itself, since every joint shows. This is not a place to be "off just a little"!

You might ask, "why bother with all this extra effort?" The answer appears just below the subhead for this post, and is worth a thousand more words.

DIY tile pic for week of Mar 16 2009

copyright 2009 - all rights reserved
_______________________________________________

See this photos like this featured along with all sorts of other related ceramic tile information and articles on the new DIY Tile Zone at Helium.com.

If you have a DIY tile pic that you'd like to share, please leave a Comment here. If I use your picture, I'll link to your blog or website. ~Jim

Sunday, February 22, 2009

DIY Tile Pic of the Week: Cottage backsplash

Nostalgic cottage-style tile backsplash uses "subway" tiles and more:

 
cottage tile backsplash in white and tan

This week's project was one that could indeed be completed by a DIYer on a weekend. It's a classic cottage design using "subway" tile (note the offset layout) in two sizes and colors.

The tan tile in 5 by 5 squares forms a visual 5" backsplash. The same color is reflected in the top band (cut to size on site). These tan tiles ground the wall area and frame the off-white subway tile mid-section, creating a three-dimensional effect.

See the small inset tiles in beige? Those are pears, apples, and grapes. This adds to the texture and depth of the stove's backdrop. Using fruit, rather than a more abstract design, makes for a homey feel. This is Gramma's Kitchen, for sure. (Literally, in this case.)

Later, the homeowner will paint the surrounding cabinets using both colors from the tile to follow-through with this theme. Since both hues are neutral, all sorts of bright-color possibilities are open for accessorizing.

At just under thirteen square feet, this job budgets at well under $1,000 and is easily completed in less than ten hours total work time (one weekend is best). Tools required include a wetsaw (rental widely available), and the proper size trowel (per adhesive manufacturer's instructions).

Notice how the mixture of three different tile sizes really makes this difference in this small job?

DIY tile pic for week of Feb 22 2009

copyright 2009 - all rights reserved
_______________________________________________

See this photos like this featured along with all sorts of other related ceramic tile information and articles on the new DIY Tile Zone at Helium.com.

If you have a DIY tile pic that you'd like to share, please leave a Comment here. If I use your picture, I'll link to your blog or website. ~Jim

Thursday, February 12, 2009

DIY Tile Pic of the Week: Natural stone shower walls

Walk-in shower uses natural stone squares in 6 by 6


natural stone shower walls in 6 by 6

This 44" by 32" shower, completed just before the New Year, features slate tiles from Home Depot. Grout lines are 3/16", to showcase each tile.

Natural stone is one of the more difficult products to install. Each 6" by 6" piece is unique. Thickness, especially, varies quite a bit - from nearly 1/2" to barely more than 1/8". Some tiles aren't exactly square, and others have one or more "missing" corners. Proper installation calls for careful attention to sizing, spacing, orientation, and color/texture.

This is a great way to express your individuality. No two installers will put these tiles together the same way, so even "identical" projects won't be. Some slates are very jazzy, while others much less interesting. Deciding how to showcase the fancier ones makes all the difference.

This wall material should be sealed prior to installation, for best results. Grout loves to stick in the nooks and crannies of any natural stone tile. For a wet area like this, sealer is even more important. Because they don't have the typical glasslike finish of ceramic or porcelain tile, stone tiles are more difficult to keep clean.

Are the results - a beautiful and unique design - worth the extra effort and maintenance? That's a personal choice; only you can decide for yourself.

DIY tile pic for week of Feb 12 2009

copyright 2009 - all rights reserved
_______________________________________________

See this photo featured along with all sorts of other related ceramic tile information and articles on the new DIY Tile Zone at Helium.com.

If you have a DIY tile pic that you'd like to share, please leave a Comment here. If I use your picture, I'll link to your blog or website.

Thursday, January 08, 2009

DIY Tile Pic of the Week: Tiny tile floor

Foyer powder room floor is small but eye-catching

small powder room, fancy tile

Our very latest DIY tile job was one of the smallest floors I've ever done, for our brand new powder room. We used left-over ceramic tiles from a couple previous jobs, blending them for a unique effect.

With less than 16 square feet to cover, this project called for simplicity. We hoped to achieve a touch of elegance, while blending this new tile floor into our existing tile foyer. Each area uses shades of brown and tan, and features large (12" square or 13" square) tiles accented with much smaller tiles.

The foyer pattern uses two accent tile sizes in a symmetrical diamond pattern - much too busy for the new powder room. We thought at first to make a basic inset border using the brown tiles. Even this was too much, so we opted for an asymmetric "L"-shaped design instead. Bull-nosed base ("splash") tiles in a shade between the two colors used brought it all together.

The wall tiles you can see in the picture are the same color and type as the large floor tiles, but much smaller. We used the minimum width grout lines for those, and chose "alpine white" for grout, to compliment rather than match the floor's "mocha" grout selection.

The finished job has a regal Tudor feel to it, without being overbearing. What do you think? Good choice, or still over the top for such a tiny room?

DIY tile pic for week of Jan 5 2009

copyright 2009 - all rights reserved
_______________________________________________

See this photo [coming soon], and all sorts of other related ceramic tile information and articles on a brand new DIY Tile Zone at Helium.com.

If you have a DIY tile pic that you'd like to share, please leave a Comment here. If I use your picture, I'll link to your blog or website.

Thursday, January 01, 2009

DIY Tile Pic of the Week: Faux Mosaic

Foyer Faux Mosaic Tile creates dramatic entry

faux mosaic foyer tile Helium executive Andrew Ressler sent me this photo from his most recent DIY tile project.

He wrote: " The tile I bought from Home Depot. I put it on over cement board also from Home Depot. I used a color-matched grout to really make it look nice. I used a 3/16" grout spacing. I think it looks better than the 1/8" that the store recommended.

"I put two coats of sealer on the grout just to be sure. The tile was porcelain and didn't need a sealer.

"The biggest challenge was cutting the tile on the edges were it met a wood floor. I didn't want to cheat with an overlaid piece of wood. Just one more thing to trip over. So I used a tile saw that allowed you to move the tile tray to get more accurate cuts than one were you move the tile over the tray."

DIY tile pic for week of Jan 1 2009

copyright 2008 - all rights reserved _______________________________________________

See this photo [coming soon], and all sorts of other related ceramic tile information and articles on a brand new DIY Tile Zone at Helium.com.

If you have a DIY tile pic that you'd like to share, please leave a Comment here. If I use your tip, I'll link to your blog or website. Happy New Year!