Creating kitchens and baths for finicky customers since 1993


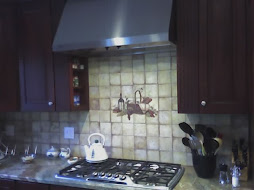
backsplash features inset metal tiles for accent and texture

Monday, October 13, 2008

5 Tips for Organizing Your Tool Shed

Keeping your tool shed organized is one of life's baffling challenges.

this tool shed needs organizing! jcb 2008 An outbuilding for tool storage can quickly become an unmanageable shelter for all sorts of useless junk, unless you start out with a system. Two problems contribute to the ill-repute of tool sheds: (one) they are usually too far from your house for convenience, and (two) you often end up storing things away in a panic when bad weather descends unannounced.

Here are five tips for avoiding tool shed nightmares.

First, decide what belongs in your tool shed.

Is this building your lawn and landscape management center? Or is it your own private workshop? Make a decision, and banish all unrelated items from the premises. If your 20-horse John Deere lawn tractor lives inside, then keep your table saw somewhere else. If your shed houses clay pots, potting soil, peat moss, and garden implements then leave the skis, golf clubs, and bicycles in the garage or basement.

Second, un-clutter your tool shed's floor.

Stop thinking of the floor as a place to put "stuff." Things get wet and rusty down there, and then you trip on them and get angry and break valuable possessions. If you simply must store things on the floor, put them in cheap plastic bins and label them clearly. Then, when you need to move that junk just to get at the important things, it's easy. Not only that, you'll actually know what you have stored in there.

Third, add shelving right away.

Shelves make organizing and retrieving your tools and supplies easy, and they help keep the floor navigable (see previous tip). For damp sheds, choose easy-to-assemble plastic shelving. For heavy boxes of supplies or tools, choose metal shelf systems when moisture isn't a problem. If you're a bit handy, build in some wooden shelves for the most versatility. Make your shelves twice as strong as they need to be for the load you will place on them, and that whole ugly "sway-back" shelf syndrome won't be your undoing.

Four, use rafter storage carefully.

When you start loading up your little shed's rafters with boards and long tools and other junk, you are admitting that you really don't have enough room in there. Face it, things placed in the rafters often remain there undisturbed for years. They sit there getting moldy, gathering black dust and spiders, useless. Consider using hooks instead. Hang up tools or other items that you use MORE often, not less. They'll be at eye level and easy to find, and you'll soon learn which objects belong where. "Hey, who took my good garden rake?" You'll know it's missing because its customary spot will be empty and quickly noticed.

Five, and finally: keep your shed clean and ventilated.

If you've sensibly organized your gear, then a quick sprucing-up will be a breeze. If possible, add an outlet and lighting so you can run a shop-vac out there. The spiders won't like this approach, and you'll smile when you open the door to get inside. If you can add a small window for natural light and ventilation, even better.

Invite outside air inside by installing a couple vent grilles in the sidewalls, if a window isn't practical. Gable or ridge vents similar to the ones on your house can also be used to keep air flowing inside. Why does this matter? Because fresh air makes your shed a better place for you, and for all your valuable stuff.

It's all about your attitude, in the end. If you see your tool shed as a nice place to visit you'll take better care of it. Your things will be where you expect them to be, and you won't just toss junk in there hoping to "get back to it later." One final thought: put a good lock on the door. No sense inviting burglars into your little sanctuary, after all your hard work.

copyright 2008 - all rights reserved
_______________________________________________

See this story as it appears on Helium.com

Thursday, October 09, 2008

Projects: Ceramic tile and air-jet tub

Our most recent big bath project had us install a new air-jet tub with a gorgeous ceramic tile tub surround. We replaced the owner's original, dysfunctional whirlpool-style tub and tile combination with all new product, including the faucet and fittings, and a polished brass shower door.
ceramic tile tub surround over air-jet tub The tile is a tradional, glossy 8 by 10 with an inset border. Installation included two ceramic corner shelves and a center soap dish. Grout lines were held at just one-eighth inch to emphasize the tile itself, rather than the pattern.

ceramic tile surround with inset border tiles over air-jet tub This second image is a bit tricky. It's a shot of the right end of the tub, with the fixture (left) end reflected in the sink area mirror. This project took about eight man-days, and involved no less than one hundred trips up and down the main stairs.

Sunday, September 28, 2008

Our refinished oak plank floor...

Oh how it shines!

refinished oak plank wood floor, the glare makes me squint!
Why relax on the weekend, when you can tarp off your dining room and refinish the ratty old oak planks? We started this project late last fall, then realized it had gotten too cold to continue. An unusual stretch of warm days for late September gave us the push we needed to complete the job.

Last year we ripped up the carpet we inherited from the previous owner. Once we finished removing about 500 padding staples, we understood why the "lovely oak floor" had been covered up. We had to fix loose boards, heavy wear and water damage, and learn to live with quite a lot of face nails. We filled, sanded, and stained the floor and moved the furniture back in.

Phase II, "apply really stinky polyurethane finish," began on Saturday. With priceless help from my oldest son, we sanded and stained all over again. (A year's worth of use takes its toll.)

Then, with every door and window wide open, we worked together to lay down the first of three coats. The finish was one I've used before, Minwax Fast-Drying Polyurethane clear semi-gloss. Note that "fast-drying" translates into "dangerous fumes." Even with all that fresh air coming in I ended up with a headache.

The glaring shine you can so plainly see in the picture comes from adding two more topcoats (per the manufacturer's recommendations). That meant two more rounds of full tarping to seal off the doorways for re-sanding with 220-grit. Applying those two extra layers of finish was almost fun, by comparison, despite the resulting headache. Now I can be fairly sure that our refurbished dining room floor can handle some heavy traffic.

We'll move the furniture back in after letting the new finish harden up for a day. I'll stop back and post another picture then.

Saturday, September 27, 2008

If you think it's tile, but it's not...

...it's linoleum!

linoleum looks like tile in powder room remodel
Not every customer wants a new tile floor, and it isn't always about budget.

This week's powder room makeover called for an Armstrong vinyl floor that the homeowner had carefully selected after much consideration. Her kitchen floor was linoleum, too, and had held up beautifully over time. Since the powder room is right across the hall from the kitchen, it made perfect sense to match and compliment the existing surface.

There was a glitch in the process, when my customer's selected floor wasn't available immediately (one-day order time), but we worked it out. I had to do some serious advance work to make sure that everything was ready to go. Usually the floor goes in right after lunch on Day One. This time, it didn't get installed until the middle of Day Two.

Day Two was also the final day! How often can you do a powder room makeover in just two days? Well, please don't ask me to do it again any time soon. I didn't spend much time sitting around, and the second day lasted until almost dark.

Despite the glitch, this room was ready for fresh paint just in time. Have you ever tried to reschedule a professional painter on one day's notice? Don't bother. We stayed on schedule and got the job done in the end. I'll stop back next week to install a couple missing fixtures; other than that, it's a wrap!

Sorry, that flash-picture doesn't do the job justice. Too much glare off the vinyl floor. But you get the idea. With fresh paint all around (not pictured), this little room looks very nice indeed.

Tuesday, September 23, 2008

My kingdom for a stud finder?

Today's powder room tear-out involved removing all the baseboard. This is usually an easy task, but I couldn't get these pieces out without breaking some. This surprised me until I got them all the way out. Can you count the nails?


wood baseboard filled with finish nails

Tuesday, September 16, 2008

...and the Tile goes on...diagonally this time

Here's the finished product for a new ceramic tile bathroom floor, mentioned in the last post:
new ceramic tile bathroom floor in diagonal 12 by 12's

The antique-look vanity and Kohler one-piece toilet are brand new, too.

diagonal ceramic tile with new vanity and Kohler toilet