Creating kitchens and baths for finicky customers since 1993


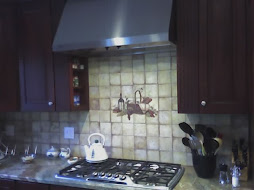
backsplash features inset metal tiles for accent and texture

Saturday, November 28, 2009

How to build a retaining wall with railroad ties

raymonds rail ties retaining wall
Retaining walls are can be beautiful or utilitarian. Materials choice matters.

By Raymond Alexander Kukkee

It's bright and sunny outside, and time to cut the grass again. You cut the side yard first, perfectly and evenly with the mower, and then look at the long grass in the back yard with trepidation. It is lawn that is far too steep and the soil is precariously eroded from endless water runoff. It is impossible to cut the grass safely with a lawnmower, so you haul out the weed whacker and start giving the treacherous area a tedious, crude haircut one more time.

You know you need a retaining wall but have procrastinated in building one, for the cost of manufactured, interlocking concrete stones commonly used to construct retaining walls is too high for your budget..

How can you build an inexpensive retaining wall?
The answer may be to build a retaining wall with railroad ties.

Where can you get railway ties?

Railroad ties, also called cross ties, are creosoted or chemically treated timbers that have been historically used to lay railway track all the way across North America. The treated wood ties resist decay for years but are eventually replaced as a matter of safety. Replacement may be with new timbers or the increasingly common concrete rail bedding ties. The replacement program has left millions of used and unused railway ties, switch timbers, and other large creosoted timbers available for other purposes including landscaping.


To find a source of railway ties, ask at your local building supply, landscapers, building contractors, or your nearest rail yard.


* Incidentally, do NOT feel free to help yourself to piles of ties you may happen to see along the railway tracks. Trespassing on railway property is both illegal and dangerous.
Buy railway ties from reputable contractors that often have contracts to legally remove hundreds, even thousands of ties at once, and do stockpile them for sale. Expect to pay higher prices for better quality timbers...

Read the rest of Raymond's retaining wall article at Helium.com

copyright 2009 Raymond Alexander Kukkee - reprints available upon request
______________________________________________

For a fantastic, in-depth look at your retaining wall options, please visit Raymond Alexander Kukkee's Zone, Retaining walls and how to build them. Thanks to Raymond for the photo shown with this article.

See this article as it appears on Helium.com

Read our previous article about building concrete or cinder block retaining walls.

We're collecting pictures of retaining walls that failed. Got one? Leave a comment here, or reach me via email.

Saturday, November 07, 2009

How to build a concrete block retaining wall


Retaining walls are great for "terracing" your yard, or for reclaiming unusable lawn areas.

There was a time when cinder block retaining walls were all the rage. That was during post-war American building boom fifty years ago. Times have changed, and now these utilitarian walls more typically adorn commercial sites.

Somewhere in between, the use of once-popular cinder block lost ground to the more contemporary "concrete block." With the that change came a lot more options that once again made block retaining walls an attractive choice for suburban homeowners.

This isn't your grandfather's cinder block wall.

We've all seen those aging, crumbly cinder block constructions. That is exactly the image that convinced so many of us to choose more modern variations. Today, many landscapers prefer dry-laid walls composed of pre-cast concrete blocks designed specifically for the job. They're very pretty, easy to work with, AND extremely expensive. For those of us on a budget, choosing a cinder (concrete) block retaining wall could be just the right choice.

The block wall advantage:

Modern concrete block is inexpensive and very durable. It's widely available for home delivery, and offers unsurpassed strength in many applications. Today's cast block is available in a variety of dyed colors and an assortment of facing finishes, although both choices add to the cost. Block retaining walls are a good choice for long straight runs, especially for heights above 16" or so. They are perfect for perpendicular walls that meet at a 90 degree corner. You can, however, lay ordinary rectangular blocks in gentle concave or convex arcs.

But first, the disclaimer:

Laying block isn't an ideal DIY project. You can't easily do the job piecemeal, or without the correct tools. Mixing and applying mortar properly can be exhausting and frustrating. You'll need to start with a decent-quality footer, too. This isn't a half-weekend task that offers easy shortcuts. Let's have a look at what's involved...

Read the rest of the retaining wall story at Helium.com

copyright 2009 Jim Bessey - reprints available upon request
______________________________________________

For a fantastic, in-depth look at your retaining wall options, please visit Raymond Alexander Kukkee's Zone, Retaining walls and how to build them. Thanks to Raymond for the photo shown with this article.

See this story as it appears on Helium.com

We're collecting pictures of retaining walls that failed. Got one? Leave a comment here, or reach me via email.

Thursday, September 24, 2009

Blending decks into yards and landscapes: Featured on NOVA Pros!

http://novapros.com/articles/featured/blending-decks-into-yards-and-landscapes/

The past twenty-five years has witnessed a phenomenal boom in the construction of big outdoor decks. Most of them are downright ugly. Many are unimaginative rectangles built with now-graying green lumber in a dull array of parallel lines. In an era of eight-foot privacy fences, plenty of homeowners don’t care how ordinary their backyard refuges might appear to the neighbors. Some of us, however, want to achieve a lovely flow from treated wood to lot-line woods, and wouldn’t dream of installing head-high solid blockades to hide our handiwork.

You can have your sprawling wooden deck, your table and chairs, the big umbrella, a giant $2,000 barbecue station, and even one of those hideous plastic weatherproof storage bins – you can have all this, and a beautiful backyard, too. Let the Jones’s next door stare all they want; theirs will be a look of admiration tinged with envy.


Shared via AddThis
_______________________________________________

See this story as it originally appeared on Helium.com

copyright 2008 - Jim Bessey

Saturday, September 12, 2009

Big tiles or small: which tiles are "just right" for your project?

What's more fun than doing a tile job? -- choosing the tile!

Shopping at tile stores is a sensory experience. So many shapes, sizes, textures, patterns and colors to choose from; it's enough to make you dizzy. At first it's easy:

"Love that! Love those! No way I'd use them!" But then comes, "-- oh, I like those, too. These would look great in our bathroom. So would these, over here."

6 x6 tile floor and white subway tile walls
And that's just in the first five minutes of browsing the tile displays. When you consider the combinations and permutations, there are actually more tile choices than there are paint colors at Sherwin-Williams. One way or another, you have to...

Narrow the field.

Most folks start with a color scheme and a budget. That cuts the possibilities by at least half. Still leaves a couple thousand potential selections. Move on to texture: smooth or "natural" surface? Glossy or matte finish? Now you're down to just a few hundred possible tiles.

Size matters.

Tiny, small, medium, large or giant -- which one feels just right to your eye? Many popular tile offerings are available in every size, from one-inch mosaics to 16" platters. That allows the tile manufacturer please a large range of customers. Let's ignore all those other options, and consider this question partly from the do-it-yourselfer's point of view.

Each tile size has a reason for its existence. Some trace their origins back to the Roman Baths and Ancient Greece. Other sizes were standardized during the post-war building boom. Still more were created to suit the appetites of modern mall builders, who wanted to cover larger areas with fewer tiles. The rest exist simply because they are aesthetically pleasing.

Here's the run-down:

  • Tiny tiles: Sheeted mosaics offer intriguing patterns of color and shape. They're easy to work with in most cases, because they require less difficult cutting. Typical sizes include one- and two-inch squares as well as similarly-sized octagons or hexagons. (The latter are more difficult to cut and fit.) Small tiles are often best for small spaces like kitchen counter top backsplashes or powder room floors, or for use as inset borders. In addition, web-mounted tiles allow the manufacturer to create intricate patterns that wouldn't work well with larger tiles.
  • "Subway tiles" (see photo) are usually glossy rectangles in a specific proportion: 2 to 1 or 3 to 1, as well as 5 to 3, are typical (but certainly not the only choices). These classic tiles make an elegant choice for traditional walls. Matching base coves, outside corners and edging ("bullnose") trims are usually available for each color and finish. Subway tiles are almost always ceramic -- lightweight, inexpensive, self-spacing, and easy to work with.
  • Until recently, builders have preferred ceramic squares in 4" or 6" sizes (see photo). They chose earth tones or elemental colors for more universal customer appeal. These "simple squares" are low-cost and easy to cut and install. They can be self-spacing or moved apart for larger grout lines, as desired. Generally, even non-stock colors can be ordered on short notice. Because the geometry is straight-forward, these tile sizes lend themselves to "checker-board" designs or "picture-framed" border layouts.
  • Larger rectangles offer a visual change-up from more familiar tile patterns. Standard sizes include 4 x 6, 6 x 8, and 8 x 10 (inches). These non-square tiles look great laid vertically, horizontally, and even in "brick"-style patterns. While ceramics are readily available, medium-sized tiles like this are more often displayed in porcelain lines. Porcelain tiles are heavier, more durable, less absorbent -- and harder to work with -- than standard ceramics. Installers will usually use tile spacers and cement-based "thin-set" mortar for best results.
  • Big tiles start at 12" square and go up from there. One popular size is 13.5" square, which probably converts to some whole number of centimeters. Paver-sized tiles were once reserved for large rooms, commanding foyers, malls, and restaurants. Now they are one of the top choices by designers for contemporary homes. Large and giant tiles are heavy, expensive, subject to shipping damage, and more difficult to install.
  • Preparation becomes critical as tile dimensions increase. DIY-level tile saws are often too small to accept these products for cutting. Layout can be tricky, to avoid weird edge-cuts and ungainly "L"s around corners. On the other hand, these (usually porcelain) tiles are incredibly durable, even for outdoor use. And they're gorgeous.
Which size is right for you? Consider room size, the level of complexity for layout (smaller tiles make layout easier, in general), and your skill level. In the end, your choice of tile size comes down to what "feels right" to you. Maybe you'll know it when you see it. When you consider all your options and choose the one that feels just right for you, you'll still be saying "I love it!" when the job is complete.

copyright 2009 - all rights reserved. Reprints available upon request.
_______________________________________________

For more information about tile floors and walls, have a look at the DIY Tile Zone in Betaville, at Helium.com. If you have questions or other feedback, please leave a comment here or on the tile zone.

Friday, July 03, 2009

How to install ceramic floor tiles next to wood flooring


Ceramic tile floors form a natural complement to hardwood floors. The trick lies in how you transition from tile to wood. Since the two materials are so dissimilar, they expand and contract at very different rates. You should never simply butt new tile to an existing wood floor, or vice-versa. Let's look at the two most common scenarios.

A. Your new tile floor will be nearly the same height as the existing wood floor:

This occurs fairly often, since hardwood floors are generally 3/4" thick. Floor tile is often best laid over 1/2" cement board; add tile that's about a quarter-inch thick, and the two floors will be nearly equal. In this case you'll need some sort of simple expansion joint. ...

Read the rest of this article...

... [and]

B. Your new tile floor will be significantly higher than the existing wood floor:

This happens quite often, given tile's requirement for heavy, solid underlayment. Many wood-slat floors, typically of oak, are only 3/8" thick. It's not at all advisable to lay tile to match this thickness -- you'd have to omit the underlayment entirely, not a good idea!

Another common reason for a tile floor that's higher than wood is that you'll be covering up a portion of an existing hardwood floor by laying tile over-top. This is done to create a traffic-friendly foyer area where your front door enters directly on a wood-floored room. ...

Read the rest of this article...

Conclusion:

With careful planning and attention to detail, you can allow your new tile floor to peacefully coexist with your original wood floor. Your transition will be strong and aesthetically pleasing, while it protects your new tile from edge damage. Done properly, your tile to wood transition will last as long as either of these highly durable materials, and look great the entire time.

copyright 2009 - all rights reserved Read Jim's profile at Helium.com
_______________________________________________

See this story as it appears on Helium.com

Saturday, June 06, 2009

Wooden planter set makes a fine deck accessory

two planters and a bench
Most decks are boring until you add some jazzy details. A pair of wooden planters with a connecting corner bench did the trick at my house.

My oldest son and I found ourselves with a free afternoon last year. We had a small stockpile of materials left over from a project my partner had done for one of his customers. I did some measuring and calculating, and we had enough for a small project.

We trekked off to our local Lowe's to buy two square plastic plant containers and a box of color-matched screws. When we returned, we assembled a few basic tools, drew up some very basic plans on graph paper, and went straight to work.

Now our plain-Jane deck has a nifty and practical corner. The hostas add a very nice touch of green, too. My wife likes the bench -- it's her favorite spot to set out her potted plants for sunning.

Want to build your own? Read more comprehensive instructions in my Helium article, "How to build a wooden planter." You can use the picture as a general guideline, too, of course.

copyright 2009 - all rights reserved    Read Jim's profile at Helium.com
_______________________________________________

Want to learn more? Head for Theresa and Raven's Container Gardening Zone to see a LOT more about turning your patio or deck into a paradise. 

If you have a project like this you'd like to share, please drop me a line.

Read about building planters on Helium.com