Not a single fixture or appliance in our homes is more crucial to our sanity than the lowly toilet. We expect our commodes to work every time, and we cringe with foul distaste when one fails in its humble mission. Yet a malfunctioning toilet must be fixed post-haste! If the kitchen sink is clogged, that can wait. Not so the potty. And it's all so distasteful: it's damp, perhaps a bit moldy inside, fouled by unspeakable germs and vile gunk no human should touch. The thought of calling a plumber, however, conjures visions of an exorbitant and illegible bill for emergency service.
Here are three secrets, revealed: First, you probably can repair that mis-behaving toilet yourself. Second, toilets aren't nearly as complicated as you fear. And last, except in the case of a truly disturbing overflow of the bowl, your toilet is much cleaner than you might expect. On the other hand, your fears of a pricey service call are well-founded. It's not at all unusual to pay almost $200 for a plumber's visit. For about $50 more than that, you could have a new toilet installed. It's worth your time, worth overcoming your reluctance, to at least give it a look.
Anatomy of the common toilet (U.S. design, residential):
Starting at the top: THE TANK. Although there are endless variations in shape and size, every commode has a water reservoir, usually a separate tank that holds ordinary tap-water used for flushing. A pipe emerges from the wall or floor nearby; most often you'll find a shut-off valve (with a small handle of some sort), which leads fresh water through a supply tube up to the tank. [Some tanks are cast as a unit with the bowl. This is a designer trick which makes repairs and replacement deliberately more expensive.]
Below the tank: THE BOWL. This part of the commode holds a second reservoir of water, necessary for effective flushing and for sealing off the sewer line from the air in your home. Most of us believe the toilet bowl to be hopelessly contaminated with exotic microbes. Unless you never clean it, that simply isn't true. Your kitchen sink almost certainly harbors more hazardous germs, especially if you have a garbage disposal.
The bowl covers the critical DRAIN. This is an two- to four-inch opening in the floor, leading directly to your main sewer or septic line. A clogged drain line doesn't even involve the toilet fixture itself; the problem's in the pipes. If your trouble lies in the drain line beneath the floor, that's the right time to call a plumber.
Things that can go wrong, and can be fixed:
Your shut-off valve can become clogged over time. If the tank seems to take an eternity to fill, the valve may need replacement. There's a second shut-off inside the tank, too: the one that sometimes doesn't stop running after you flush. For most toilets, that part costs less than $20 to replace. A typical brand of tank-filler is "Fluid-Master," sold in every hardware store. If you can shut-down either your water main or the valve with the handle below the tank, then you can do this job yourself. Cures most slow-fill or won't-stop-running issues.
Sometimes the "flapper" fails to function. In this case, water continually seeps or gurgles into the bowl (possibly wasting hundreds of gallons a week). Jiggling the handle is a common short-term solution. However, while the flapper's design varies from brand to brand, most home-owners can handle replacing that part themselves. Turn off the toilet's water supply for this chore, too.
The most humbling and distasteful problems come when the drain becomes clogged. If your handy plunger fails to clear the clog, go ahead and call a plumber. You could try "snaking" the drain yourself, but that's not a job for the faint-of-heart. Clogged drains can usually be blamed on some variation of "too much toilet paper." Prevention, and education of blissfully ignorant family members, is the only way to avoid recurrence.
The critical point: try not to be afraid. It's only a toilet. You don't have to be a rocket scientist to show the commode who's boss.
copyright 2007 - all rights reserved
+edit.jpg)
Saturday, November 24, 2007
Sunday, November 11, 2007
So you want to build a shed...
Your closets are overflowing. The basement is a rec-room and office. You don't have an attic, and there's no room in the garage for your car. Sounds like you need a shed! Maybe you could build your own. Storage buildings aren't nearly as demanding as kitchen make-overs, and you won't have to suffer weeks of eating take-out if your project enounters unexpected delays. Let's take a look at your options.
PURPOSE: How would having a shed help you? What would you be able to store in there? Decide in advance what "stuff" can be safely moved to an outbuilding. You'll have different requirements for storing bikes and golf-clubs versus lawnmowers and garden tools. Most home-owners will limit themselves to just one shed, so size and access certainly matters.
SITE: Should you keep it close to the house, or off in a distant corner? Will your neighbors object? Give location some thought before you make this decision. A roomy flat spot in the yard is ideal, but don't forget to consider lawn-drenching spring rains or devastating blizzard winds, for instance. Will your new building be pretty enough to stand proudly near your property line? You might be better served if you can add storage closer to a back or side entrance. Check with your local planning & zoning office about setbacks and regulations before you commit to anything. You might need a permit, or even board approval.
SIZE AND BUDGET: Anything you build on land can be priced by the square foot. Sheds are no exception. Just like car tires, the bigger they are the more they cost. Eight-feet-square can be plenty when you don't need to park a big riding lawn mower inside. If you do need room for your new John Deere, though, then twelve-by-twelve isn't unreasonable. The smaller size might be built for less than a thousand dollars; the bigger one could easily cost twice that much.
MATERIALS: Want your new shed to look like your house? Maybe "keep it simple" is your motto. Or maybe this is your one chance to be creative. Metal walls and roof are usually economy options. Modern wafer-board (now called OSB), painted and trimmed in pine, is a popular choice. Most people prefer regular shingles on the roof: they're inexpensive and not too tough to install. With a little knowledge and a couple extra tools, you can wrap your building with vinyl siding. Lots of sheds feature a type of plywood called Texture 1-11: it's got grooves spaced eight inches apart with a showy woodgrain suitable for staining. Those are just a sample of popular choices.
FLOOR: For parking the garden tractor you might choose a bed of gravel. Purists insist upon a solid layer of concrete, but that's the most expensive option and usually requires a building permit. You might decide to compromise by assembling a wood-frame floor: use pressure-treated lumber and minimum 5/8" plywood. The advantage of wood floors (aside from lower cost and easier construction) is the ability to level the floor on an uneven site. Disadvantage: bugs and some rodents just love the open spaces hidden underneath. Wood floors usually need some sort of ramp for easy access, too.
DOORS: You can use a regular entrance door and lock-set. You can build your own double-doors using plywood and pine trim with some back-bracing. You could even install a miniature overhead door, especially if your garden tractor is a big one! (That might be a job for a professional, though - and a bit pricey.) Consider adding a window or two, as well, for ventilation, light, and decoration. All sheds need some sort of airflow, or they get hot and musty over time.
DESIGN: You don't need to re-invent the wheel, or hire an architect. Every home center offers books of plans and materials lists. The fancier plan-books may cost ten dollars or more, but you'll have nice color pictures and detailed instructions to help make your project go easier. Your toughest decision will probably center on the roof-line. Gable roofs look great but require some skill, while salt-box and "shed"-style roofs simplify construction. Gambrel designs (think "big red barn") have been popular, but cutting and fitting the rafters can be tricky.
CONSTRUCTION: It's only a shed. You'll need bottom plates or a floor (treated lumber). Then you'll need four walls with an opening or two. If you can cut a board to proper length and hammer a few dozen nails in straight, then you can frame-up walls. Almost all shed designs offer you the option to install your sidewall materials while the wall lays flat on the ground. You have to be very careful to square-up your walls when you build that way. Measure diagonally corner-to-corner: when both diagonals are equal, then your wall is square and ready for siding. Don't forget to account for overlapping where two walls form a corner. You'll probably add pine trim on the corners after you stand-up the walls.
Installing the roof calls for caution and finesse. Your rafters may need specific angles and precise dimensions. Plenty of perfectly-handy home-owners end up buying pre-cut shed kits just so the roof components will arrive ready to assemble. Unless you buy a completed building, however, you will have to climb up on ladders to install the roof sheeting. That's the time to recruit a helper; the job's much too annoying to handle alone. On the other hand, putting the shingles on top is easier than you might think. (They even come with the instructions printed on the wrapper!)
Once the roof is done, you can add your door(s) and window(s). You'll need a level and a few screws or nails, and some sort of lock-set or hardware. Nothing you can't handle. Once again, these items arrive with printed instructions attached, just to make your life easier! You may want to add some shelving inside, too - depends on what you're going to store in there.
PAINT: Or stain, unless you've decided on vinyl siding (or something similar). When the hammering's complete, be sure to go ahead and apply a weather-proof finish. Don't let rain or sun or insects ruin all your hard work. Even a couple of weeks' delay could be disastrous. Just do it now, so you can move your stuff in right away.
Building your own shed is a wonderful project, and the whole family can help you do it. When it's done, you can proudly point to it and say: "I built that!". You'll also have saved yourself at least a few hundred bucks on the labor. Then you can go out and buy some more stuff to put in the garage! Have fun, and don't forget to take pictures.
copyright 2007 - all rights reserved
Saturday, November 10, 2007
Extreme Make-Over, Stairs Edition
 I finally bought a digital camera, by accident: it came inside my new phone. Now I can post simple descriptions of interesting jobs we've done, and let the pictures do most of the talking. This job was a tricky one, a referral from a friend who specializes in new flooring. He was smart to hand it off, but he did miss out on all the fun! Here's my view from the driveway, approaching my new customer's house.
 The new owner of this lovely home, Roman Jones (not his real name), made a dreadful discovery after he bought the place. When he removed the unwanted carpeting from his foyer staircase, he found the treads underneath were made of particle board. He thought they were hardwood, like all the rest of the floors downstairs. That's when Roman called my flooring friend and asked him to quote an extreme make-over, staircase edition. Mike, the floor-guy, considered replacing all the old particle board treads with new maple treads. That would have been a lot easier than what we ended up doing, but it also would have created some structural issues. This staircase was built in a factory, as a unit. In my opinion, tearing the treads out could have weakened the whole stair system. Since I have to offer a warranty on whatever work I perform, I decided to seek advice from people who build stairs for a living.
 The solution, after a couple of consults, was to cover the old treads with new solid-maple treads and nosings. These specialty parts were created from maple planks by Steve, at Pittsford Lumber Co. in upstate NY. The rest was up to us, to assemble the pieces on site. That involved a great deal of careful measuring and sanding. (Notice the tarping in the next photo.) Here's a shot of the job, in progress, with spindles removed and ready for surgery on the existing stair-treads. My partner, another Mike, and I cut all the original particle board overhangs off. This part of the job created tons of dust and debris, and called for all sorts of violent tools. We used a power saw, jigsaw, handsaw, chisels, and both belt-sander and cordless router. Not to mention the mighty shop-vac, which probably ran more than any other single tool.
 pieces on site. That involved a great deal of careful measuring and sanding. (Notice the tarping in the next photo.) Here's a shot of the job, in progress, with spindles removed and ready for surgery on the existing stair-treads. My partner, another Mike, and I cut all the original particle board overhangs off. This part of the job created tons of dust and debris, and called for all sorts of violent tools. We used a power saw, jigsaw, handsaw, chisels, and both belt-sander and cordless router. Not to mention the mighty shop-vac, which probably ran more than any other single tool.
 The carpentry work itself (the fun part) involved a fairly intricate mating of quarter-inch solid tread material with the front and side nosings. We devoured two bottles of wood glue and several dozen strategically-placed pin-nails (air-driven). At this stage of the project, my heavy Porter-Cable belt sander made everything come together. We added some maple-formula wood filler as needed. Sanding progressed from 120-grit belts to 220-grit detail pads. Once again, the shop-vac racked up the most hours! (But the tarps worked -- very little dust reached the adjoining rooms.)
 All together, the work spanned ten days (about sixty man-hours). Making all that carpentry look pretty called for the services of my previously-unused cordless "mouse" sander, and quite a few sheets of 220-grit paper. Maple requires pre-treatment,  but looks best without any color added. We used a fast-drying polyurethane finish: two coats, sanded between, applied with a bristle brush. I checked Minwax.com first, and noticed they advised against using the popular foam brushes for this product -- too many bubbles. I have to admit, the results were pretty spectacular. I'm not much of a finisher; I prefer cutting, gluing, and nailing to brushing. By the time I enlisted my oldest son's help to re-install the original spindles (final photo), this refurbished staircase looked like a million bucks. The home-owner will paint the risers and stringers white, to complete the new look. I'm proud to say, "I built that"!
 but looks best without any color added. We used a fast-drying polyurethane finish: two coats, sanded between, applied with a bristle brush. I checked Minwax.com first, and noticed they advised against using the popular foam brushes for this product -- too many bubbles. I have to admit, the results were pretty spectacular. I'm not much of a finisher; I prefer cutting, gluing, and nailing to brushing. By the time I enlisted my oldest son's help to re-install the original spindles (final photo), this refurbished staircase looked like a million bucks. The home-owner will paint the risers and stringers white, to complete the new look. I'm proud to say, "I built that"!
Friday, August 17, 2007
Balcony deck: We add a pergola!

Had a day "off" with some help from my brother-in-law, so we zoomed over to Home Depot, bought some materials, and built a pergola for my backyard balcony deck. "This changes everything!"

Monday, May 14, 2007
Getting back on track
It's been months since I've posted here--over a year, in fact. Well, alright, I've been busy! Still working with T. McKenna Plumbing Inc. here in Fairport, still building kitchens and baths for a great group of new customers. And I'm still working with some truly fine people that I met in the now-extinct Chase-Pitkin organization. We bought a house, too! My wife and I have gone from blissful renters on the west side to delighted (but exhausted) home-owners on the east side. That's where all my free time went, believe me.
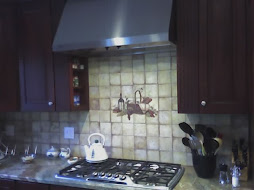
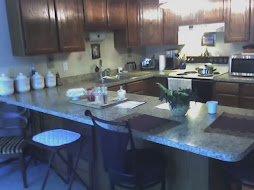
We bought a sweet little ranch built in the early 1960's. Since I know a fairly competant contractor--and my wife loves to upgrade and decorate--we've made a few (understatement) improvements. It's not that we've invested a ton of money (well, maybe a few pounds!), but we wanted to put our own stamp on the place. So we started with paint, which is always a smart and economical place to begin. We did a lot of sprucing-up in general, including some serious weeding and mulching in the beautiful gardens that the previous owner left behind for us. Last fall I took advantage of an Indian-summer day, climbed onto the roof, and hoed-out the gutters. Of course we upgraded the original kitchen, but nothing too drastic: we used cabinets that one of my customers didn't want to save (more paint). I haven't gotten to the bathroom yet (yes, that's singular: bathroom...), but we have plotted the location of our future powder room. The entry foyer desparately needed new tile, so we had to make a decision about where a couple of new walls were going to be. The actual half-bath will have to wait for a cash-infusion. Most of what we've done was eighty percent sweat and twenty percent money.
Anyway, I made a promise to myself to get up-to-date here, and I intend to follow-through. I have plenty of good pictures, and a couple good stories. In the days and weeks ahead I'll return here to get those posted properly. For now, it's good to be back. See you soon.
Subscribe to:
Posts (Atom)


.jpg)


