Creating kitchens and baths for finicky customers since 1993


backsplash features inset metal tiles for accent and texture

Friday, January 30, 2009

DIY Tile Tip of the Week #4

Buy clearance tile to save money:

buy clearance tile to save money I love ceramic tile, but it sure can be expensive. There's such an incredible price range, from about a dollar per square foot to $50 a foot and more. I'm a cheapskate at heart, so I've never paid full price for tile I've installed in my house.

Did you know that most tile retailers have Clearance Tile on hand regularly? With so many tile choices, these smaller stores don't usually stock much tile. It's all special-ordered from larger wholesalers. So what happens when orders get cancelled, or don't get picked up? What about when customers return a box or two that turned out to be "extra"? That's how tile clearance land happens. It's just too expensive to ship heavy tile back for credit most of the time.

This same "we don't want to ship it back" attitude is true for some tile installers, too. We have a huge rack filled with orphaned boxes of tile in the shop I work for. This tile can be bought for pennies on the dollar.

Even the big box stores like Lowes and Home Depot sometimes offer deep discounts on their ceramic tile inventories. When they discontinue a style and get down to just a few boxes, they want that tile GONE. You have to be careful that there's enough square footage to cover your project, but the savings are major.

What could you do with just a box or two of tile you find deeply discounted?

  • A fireplace surround

  • A bathroom accent area over a vanity

  • A small foyer - mix and match for a larger foyer

  • A fancy bathroom vanity top

  • A cool tile inlay coffee table

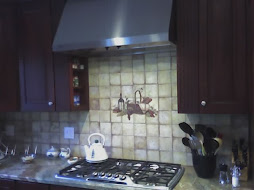
  • A small section of backsplash for your kitchen, maybe just behind the stove
With an open mind and a sharp eye you can find some great bargains on formerly-expensive tile for your next project. Or find some interesting tile first and dream up a project to fit. Let your imagination run wild with really cheap tile!

This is Tip #4, Jan 29 2009

copyright 2009 - all rights reserved
_______________________________________________

See this tip [coming soon], and all sorts of other related ceramic tile information and articles on a brand new DIY Tile Zone at Helium.com.

If you have a DIY Tile Tip that you'd like to share, please leave a Comment here. If I use your tip, I'll link to your blog or website.

Friday, January 16, 2009

DIY Tile Tip of the Week #3

MIX TILE SIZES for great designs:

foyer tile uses smaller diamonds

Ceramic tile comes in a myriad of sizes and shapes, yet most tile projects use a single size - usually square - in a plain grid pattern. You can spice up your next ceramic tile design by mixing small tiles within a field of larger tiles.

This isn't rocket science for interior design; it's done all the time by professionals. No reason you can't adopt their visual strategies to make your DIY tile job look fantastic.

Choose your main "field" tile for base color and coverage. A medium-sized floor area, for instance, might best use 12" square tiles of a pastel earth tone. This selection provides lots of design flexibility. Now choose an accent color in a smaller tile to add visual flair to an otherwise ordinary floor.

Small tiles can be added as inset borders or as linear stripes, or positioned like diamonds (see photo) where four square tiles meet. Remember that ceramic tile last for decades, so be careful about choosing colors that dictate future decor choices too stringently.

The important thing is choose pizazz over plain. If you're going to the trouble to lay tile that will last a half century, you might as well make your project provocative! Or at least interesting. Have a look at some of the pictures displayed here (sidebar, for instance) to see examples of jazzy tile designs of all sorts.

This is Tip #3, Jan 16 2009

copyright 2009 - all rights reserved
_______________________________________________

See this tip [coming soon], and all sorts of other related ceramic tile information and articles on a brand new DIY Tile Zone at Helium.com.

If you have a DIY Tile Tip that you'd like to share, please leave a Comment here. If I use your tip, I'll link to your blog or website.

Thursday, January 08, 2009

DIY Tile Pic of the Week: Tiny tile floor

Foyer powder room floor is small but eye-catching

small powder room, fancy tile

Our very latest DIY tile job was one of the smallest floors I've ever done, for our brand new powder room. We used left-over ceramic tiles from a couple previous jobs, blending them for a unique effect.

With less than 16 square feet to cover, this project called for simplicity. We hoped to achieve a touch of elegance, while blending this new tile floor into our existing tile foyer. Each area uses shades of brown and tan, and features large (12" square or 13" square) tiles accented with much smaller tiles.

The foyer pattern uses two accent tile sizes in a symmetrical diamond pattern - much too busy for the new powder room. We thought at first to make a basic inset border using the brown tiles. Even this was too much, so we opted for an asymmetric "L"-shaped design instead. Bull-nosed base ("splash") tiles in a shade between the two colors used brought it all together.

The wall tiles you can see in the picture are the same color and type as the large floor tiles, but much smaller. We used the minimum width grout lines for those, and chose "alpine white" for grout, to compliment rather than match the floor's "mocha" grout selection.

The finished job has a regal Tudor feel to it, without being overbearing. What do you think? Good choice, or still over the top for such a tiny room?

DIY tile pic for week of Jan 5 2009

copyright 2009 - all rights reserved
_______________________________________________

See this photo [coming soon], and all sorts of other related ceramic tile information and articles on a brand new DIY Tile Zone at Helium.com.

If you have a DIY tile pic that you'd like to share, please leave a Comment here. If I use your picture, I'll link to your blog or website.

Tuesday, January 06, 2009

DIY Tile Tip of the Week #2

TAMP YOUR TILE:

rubber mallet for tile tamping Your DIY tile job will turn out better if you use an old tileman's trick: tamp your tile down with a rubber mallet. This is especially important for large tiles of 12" square and up. Big tiles can trap air underneath and fail to achieve a good, solid set into your adhesive base.

Large or small, all tile jobs can benefit from a gentle tamping. The vibration promotes excellent adhesion, and the act of "beating in" your tiles will help you get them level with each other.

Use caution, however, when smacking your tiles with a rubber mallet. I recently smashed a perfectly good tile into three jagged pieces when I got a bit too enthusiastic with the mallet. Be sure to use a consistent tamping pattern. My choice is middle, corner, corner, corner, corner. You'll find what works best for you by trial and error as you start your tile job.

Happy tamping!

This is Tip #2, Jan 6 2009

copyright 2008 - all rights reserved
_______________________________________________

See this tip [coming soon], and all sorts of other related ceramic tile information and articles on a brand new DIY Tile Zone at Helium.com.


If you have a DIY Tile Tip that you'd like to share, please leave a Comment here. If I use your tip, I'll link to your blog or website.

Thursday, January 01, 2009

DIY Tile Pic of the Week: Faux Mosaic

Foyer Faux Mosaic Tile creates dramatic entry

faux mosaic foyer tile Helium executive Andrew Ressler sent me this photo from his most recent DIY tile project.

He wrote: " The tile I bought from Home Depot. I put it on over cement board also from Home Depot. I used a color-matched grout to really make it look nice. I used a 3/16" grout spacing. I think it looks better than the 1/8" that the store recommended.

"I put two coats of sealer on the grout just to be sure. The tile was porcelain and didn't need a sealer.

"The biggest challenge was cutting the tile on the edges were it met a wood floor. I didn't want to cheat with an overlaid piece of wood. Just one more thing to trip over. So I used a tile saw that allowed you to move the tile tray to get more accurate cuts than one were you move the tile over the tray."

DIY tile pic for week of Jan 1 2009

copyright 2008 - all rights reserved _______________________________________________

See this photo [coming soon], and all sorts of other related ceramic tile information and articles on a brand new DIY Tile Zone at Helium.com.

If you have a DIY tile pic that you'd like to share, please leave a Comment here. If I use your tip, I'll link to your blog or website. Happy New Year!

DIY Tile Tip of the Week

USE SPACERS:

Tavy tile spacers stock image For perfect layout every time, with uniform spacing of your tiles throughout, use Tavy Tile Spacers to separate tiles. These simple and reusable plastic tile spacers help you achieve professional-quality results on floors and walls.

Choose grout line sizes from 1/16" to 3/8." Different sizes use different colors to help prevent mistakes. Tavy Spacers are sold at Lowes and most pro-level tile retailers. Bags of about 100 (plenty for most jobs) sell for just under five dollars.

This is Tip #1, Jan 1 2009

copyright 2008 - all rights reserved
_______________________________________________

See this tip, and all sorts of other related ceramic tile information and articles on a brand new DIY Tile Zone at Helium.com.

If you have a DIY Tile Tip that you'd like to share, please leave a Comment here. If I use your tip, I'll link to your blog or website. Happy New Year!