+edit.jpg)
 |
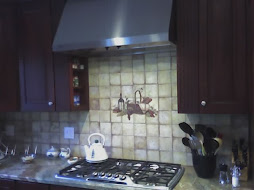
| smaller tumbled marble tiles make a great backsplash |
Allow me to politely disagree.
Ceramic tile projects do have certain aspects that lend themselves to DIY efforts. Working with tile can be similar to playing with Lego blocks: you do it piece-by-piece and you can undo your mistakes easily, at first anyway.
On the other hand, errors left unfixed for more than a day or two are all but permanent. Furthermore, the tools you'll need for professional results almost always include a wet-saw -- not a 'basic tool' in my opinion. Why will you need a water-cooled tile saw? To cut around the inevitable electrical outlets above your counter-top. And let's face it, many DIY enthusiasts shy away from electrical work, with good reason.
Let's look at the cons of doing your own backsplash tile, first; then we'll consider tips for doing the project if you decide to go ahead.
- Kitchen projects are highly visible, and the backsplash is at eye-level.
- Laying out the tile pattern can be problematic.
- As with all tile projects, surface preparation is critical to getting good results.
- You'll be working over-top of a two-foot surface and beneath the overhead cabinets -- it's an awkward angle, at best.
- The topmost row of tiles will almost always have to be cut to fit the upper cabinets.
- Using thinset mortar around finished wood and polished counters can make a big mess.
- You will have to work with and around electrical outlets and switches.
- This all but requires using a wet-cutting tile saw.
- Exposed ends will need proper finishing attention, or the project will look amateurish.
- Grouting to the counter-top and up to the top cabinets isn't fun. Expert caulking is important.
- Choose your tile carefully, with a designer's eye to the relatively small space involved. Take some measurements, and look for tile sizes that might suit the numbers. In general, avoid choosing tiles larger than 8" square.
- With your counter-tops completely clear, protect the surface with paper or cardboard. For each wall area, physically lay-out the actual tiles. This will help you spot cutting problems at outlets, ends, and corners. Be sure to consider the spacing required for bull-nose edging tiles or other tile edging materials at every open end.
- Remove all remnants of wallpaper or loose paint. Repair any large gouges and smooth any existing rough surfaces, using plaster-based wall products, rather than vinyl joint compound. Consider priming the entire area for improved adhesion.
- If possible, use mastic adhesive or double-stick plastic sheets (at most big-box stores now), rather than thinset mortar. Less mess, and easier clean-up for both methods.
- Use full, uncut tiles as your first row (at the counter-top). To allow for an expansion joint, use strips of standard cardboard (not corrugated) between the top's surface and the bottom of that first row. Remove spacers before grouting.
- Rather than disconnecting outlets and switches, carefully pull each fixture out of its box (to at least 1/2" away from the wall surface), and use electrical tape to cover all exposed screw connections. For the safest approach, turn off ALL circuits involved until the electrical devices are safely taped.
- Can you avoid buying or renting a wet-saw? Yes, but the alternative involves using a diamond-coated grinding wheel and making a big dust mess -- not to mention the dangers to your fingers when cutting individual tiles. Your best bet is to place every uncut ("field") tile that you can -- first -- and then rent a professional tile-cutting saw for as little as a half-day. Be sure to follow ALL safety directions for using wet-saws.
- Use care when cutting around outlet openings, so that the new tile will support electrical devices at the new surface depth. You can re-install those fixtures before grouting, if desired. (Use masking tape to protect them during grouting.)
- Consider using a wood molding in place of any final, cut row of tiles just below the upper cabinets. If your last row would be 1 1/2" or smaller (fairly typical), this might even be your best option -- and it will save a lot of cutting, tricky/awkward grouting, and caulking.
- When you're ready to grout, be sure to follow the directions on the package; but tackle the job one area at a time, even if you have to make multiple batches of grout. Don't worry, as long as you keep using the same bag or box of dry grout, the grout color will remain reasonably consistent. You can easily clean grout that wanders onto adjacent surfaces in the first hour after application, so don't worry too much about the mess.
- After the grout has dried, carefully caulk the joint between counter-top and row one with a high-quality, silicone-based caulk. Use clear, translucent, or a color-matched product. Be sure to use the least amount possible, rather than trying to wipe big smears from finished surfaces.
copyright 2010 - reprints available upon request
_______________________________________________
What tile problems have you encountered? Your ideas for future posts and pictures are always welcome. For more tile information, see my DIY Tile Zone, hosted on Helium.


.jpg)


