Creating kitchens and baths for finicky customers since 1993


backsplash features inset metal tiles for accent and texture

Saturday, June 05, 2010

Adventures in tub tile: Fun with shapes and accent pieces

Photo by Jim Bessey
tile tub surround uses FOUR tile types!
Four distinct tile sizes and types combine for a stunning design
 Late last fall we tackled a tricky bathroom filled with interesting tile, including the tub surround pictured above. The central design uses 13"-square porcelain tiles with some rather aggresive shading and swirling. The designer added the same selection in a 6"-square for accent, then went even farther by including a gold-metallic border rope surrounding a 2-by-2 mosaic band. Next, above that accent band is the final touch -- the same 6-by-6 tiles laid diagonally.

Is this design too busy for your eye? The homeowner loved it, and was pleased with my attempts at both random and small-pattern layout. This is demanding work, using so many sizes and placements of different tiles in the same small area. You have to be careful doing this sort of design because you know that people will be looking closely every time they shower! (One of the 6-by6 tiles actually had to be chiseled out and replaced due to a minor but noticeable spacing issue -- that wasn't fun at all.)

Photo copyright 2010 Jim Bessey * Reprints with attribution, unaltered.
_______________________________________________
Want to know more about ceramic and porcelain tile for floors, walls, tubs and showers? See my DIY Tile Zone hosted on Helium.com

Friday, June 04, 2010

Bathroom floor tile adventures: "I see patterns ... everywhere?"

Forming floor tile patterns can be risky business --

Our customer's initial response was "rip it all out!" I'm not kidding. Then the homeowner thought about it overnight. This bold pattern was permitted to stay put.

12x12 floor tiles in pattern
Rarely does a ceramic or porcelain floor tile lend itself to pattern-forming as well as this one. A large majority of installations call for careful randomizing (which certainly does sound like an oxymoron). Most tile instructions insist upon box-mixing and random rotation of each tile, or conversely require that the tiles maintain a given orientation specifically to avoid patterns.

close-up of floor tile pattern
tiles combine light and dark shading
This tile was different. It's shading and pigment variation was so pronounced that it was easy to visualize a wild assortment of pattern-matching. My design may have started accidentally, but once my eye saw a way to create floor-art I had to keep going. Of course there was an inherent risk in laying the tile artistically -- the homeowner was dead serious in his original dislike of the results.

zoom-in on floor tile pattern
closer view of 8-tile pattern
Notice that it took eight full tiles to form the base image for this floor. That's a lot of tedious tile selecting. Then, in order for the concept to "work" I had to keep going -- a similar yet complementary image is formed to the left, and is partially covered by the toilet and vanity. However, if there had not been a way to continue the theme, I'd have had to abandon the idea.

I'm not sure how well this earthy sandstone tile would have looked "randomized." With such enormous variation and contrast in tone it would be tough to achieve something that looked 'unplanned.' Some of these tiles actually display a mirror-image of another tile -- a visual stunt that can ruin any attempt at non-patterned designs.
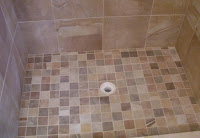
shower tile floor and walls checker-board
Large & small tiles using random mix
One of our more recent tile jobs also used an extravagantly-varied tile surface; each tile seemed to have 'grain' and this had to be taken into account. In this case, we all agreed it was important to use two methods to randomize the overall tile image -- we used 'checker-boarding' and made sure that similar tile faces were never adjacent (which might sound easier than it is in practice). Notice how crucial the lack of patterning becomes for the 2x2 shower floor tiles.

Whether your floor tile lends itself to patterning or not, it's always smart to mix boxes and dry-set a large area just to see how the finished work will look. This is also an easy way to double-check your intended layout for cutting or other visual problems. Good planning makes for great results.

copyright 2010 - all rights reserved * photo reprints with attribution, unaltered
 _______________________________________________
Would you have insisted on having the patterned design removed? Would you even consider buying a tile with this much variation in shading? How do you like the wood-look tiles, laid in a checker-board pattern -- too eye-boggling? 

If you'd like to learn more about home tile applications, have a look around at the DIY Tile Zone hosted on Helium.com. See also:  A Hard Look At Ceramic Tile.: An article from: Flooring

Thursday, June 03, 2010

Tile tub surrounds: Finding your niche

Tub surround tile niches are cool, and each is unique.

Niches are formed using an opening in the wall, a manufactured metal "pan," and a variety of tiling methods to blend with or accent the rest of the tub-area tile work.

Why choose a niche, versus other types of soap dishes and shelving? Design and aesthetics give niches the first-place vote. They do not intrude on the tub's space, and they don't interrupt the flow of the tile the way corner shelves do.

On the other hand, a niche adds substantial cost to the job -- mostly in added labor. One niche can easily add an entire day's work to a five-day job. There's extra time spent on careful layout, more time in cutting and re-framing the opening, hours more added for tile cutting (usually more than 20 added cuts!), and more time lost while grouting and caulking. It all adds up; but the pay-off is so high... well, just look at these pictures!


elegant tile niche

Simple and elegant: this one combines a partial picture-frame effect with interior bullnose finish, all using the same tile selection and carrying layout lines cleanly through the niche. For accent, this homeowner designed a band of two-by-two tiles just above the niche frame.

basic tile niche

Even simpler: this niche displays no picture-frame effect and blends beautifully with the surrounding tile. Notice how the grab bar aligns perfectly with the centered niche.

fancy tile niche

Jazzy and artistic: one of our most recent, this is also the most complicated. It uses a double-picture-frame design and adds smaller accent tiles in the back wall for an eye-popping finished product. The accent band above the niche uses a third ribbon-tile of the same finish.

modified niche design

Blending styles: our final example uses a modified picture-frame with a 'window sill' effect, and also includes accent tiles applied to the back wall. Notice the matching band of these same accent tiles at eye level. The accessory you see below the niche is a preformed corner seat.


Tiling a tub surround and adding an integral niche is typically beyond the skills of do-it-yourselfers.

When you're contracting professionals to do a job like this, however, it's nice to know you have plenty of choices. In addition, once you have an idea of the extra work involved, you might not be quite as easily shocked at the prices quoted. Keep in mind that a tile niche can be expected to last 30 to 50 years, same as the rest of the tiling in your remodeled bathroom.

All photos copyright 2010 by dzyne -- reprint with attribution please. _______________________________________________
Which niche looks best to you?  Do you prefer the simplistic approach, or like it better when the niche becomes a design focal point?

If you've had your bathroom remodeled using ceramic or porcelain tile and would like to share a picture of it here, please contact me via comments or my email link. If you'd like to learn more about tile topics, see our companion DIY Tile Zone hosted by Helium.com.

Saturday, February 13, 2010

Tumbled marble makes a magnificent backsplash tile choice

tumbled marble tile backsplash
Tumbled marble tiles, natural stone cut to 4" by 4" squares, pre-sealed for easy handling.

Henrietta NY: A kitchen customer recently updated her ugly old laminate counter tops to natural granite. She called us in to add the finishing touch -- a gorgeous tumbled marble backsplash. These little squares add a warm, distinctive look without any need for fancy borders or decorative inserts.

Tumbled marble is natural stone, cut to size and softened by abrasion. They are supplied pre-sealed for easier grouting and a longer-lasting luster. Every tile is distinct, though many are similar. Patterns emerge randomly, creating real eye-appeal effortlessly.

natural marble tile backsplashInstallation is a breeze, with careful layout preparation. We used the same tiles at the edges as for the rest of the field, simply choosing best-quality pieces for borders. Before beginning, we mixed all boxes randomly to ensure smooth blending. We used 3/16" spacing for sanded grout.

Marble tiles have to be cut with a diamond blade, typically water-cooled. These are fragile because of natural veins within the stone itself, so sometimes they just break. That's one of the reasons it's important to order a couple of extra square feet. We had THREE full tiles left over when we finished.

Our customer was thrilled with the finished product. She was concerned about blending granite and marble in the same space, and rightfully so. As you can see, each complements the other nicely. The two natural products provide a rich, yet earthy tone that doesn't overpower the room. This job took less than two full workdays, keeping the labor well under $1,000.

Reprints available on request.
_______________________________________________

For many homeowners, a tile backsplash makes a great DIY tile project. It's a small area, and one that doesn't disrupt your life the way a new floor might. Preparation for wall tiles is also less extensive than what's required for floors.

For more DIY tile information, please visit Jim's DIY Tile Zone hosted by Helium.com.

Sunday, December 06, 2009

Raymond draws his own conclusions about retaining wall construction


Raymond and I have discussed some of the aspects of building retaining walls over the past few weeks. One important factor is making sure you've had enough rest to carry you through a physically-demanding project.

Raymond drew this graphic to illustrate his opinion on the subject.

Reprinted by permission from Raymond Alexander Kukkee. Read Raymond's profile at Helium.com

copyright 2009 - reprints available on request
_______________________________________________

For a fantastic, in-depth look at your retaining wall options, please visit Raymond Alexander Kukkee's Zone, Retaining walls and how to build them. Thanks to Raymond for this graphic.

Have you ever built a retaining wall of your own? Got pictures? Contact me here, to share them.

Saturday, November 28, 2009

How to build a retaining wall with railroad ties

raymonds rail ties retaining wall
Retaining walls are can be beautiful or utilitarian. Materials choice matters.

By Raymond Alexander Kukkee

It's bright and sunny outside, and time to cut the grass again. You cut the side yard first, perfectly and evenly with the mower, and then look at the long grass in the back yard with trepidation. It is lawn that is far too steep and the soil is precariously eroded from endless water runoff. It is impossible to cut the grass safely with a lawnmower, so you haul out the weed whacker and start giving the treacherous area a tedious, crude haircut one more time.

You know you need a retaining wall but have procrastinated in building one, for the cost of manufactured, interlocking concrete stones commonly used to construct retaining walls is too high for your budget..

How can you build an inexpensive retaining wall?
The answer may be to build a retaining wall with railroad ties.

Where can you get railway ties?

Railroad ties, also called cross ties, are creosoted or chemically treated timbers that have been historically used to lay railway track all the way across North America. The treated wood ties resist decay for years but are eventually replaced as a matter of safety. Replacement may be with new timbers or the increasingly common concrete rail bedding ties. The replacement program has left millions of used and unused railway ties, switch timbers, and other large creosoted timbers available for other purposes including landscaping.


To find a source of railway ties, ask at your local building supply, landscapers, building contractors, or your nearest rail yard.


* Incidentally, do NOT feel free to help yourself to piles of ties you may happen to see along the railway tracks. Trespassing on railway property is both illegal and dangerous.
Buy railway ties from reputable contractors that often have contracts to legally remove hundreds, even thousands of ties at once, and do stockpile them for sale. Expect to pay higher prices for better quality timbers...

Read the rest of Raymond's retaining wall article at Helium.com

copyright 2009 Raymond Alexander Kukkee - reprints available upon request
______________________________________________

For a fantastic, in-depth look at your retaining wall options, please visit Raymond Alexander Kukkee's Zone, Retaining walls and how to build them. Thanks to Raymond for the photo shown with this article.

See this article as it appears on Helium.com

Read our previous article about building concrete or cinder block retaining walls.

We're collecting pictures of retaining walls that failed. Got one? Leave a comment here, or reach me via email.