Creating kitchens and baths for finicky customers since 1993


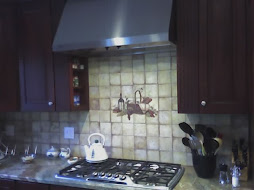
backsplash features inset metal tiles for accent and texture

Thursday, September 24, 2009

Blending decks into yards and landscapes: Featured on NOVA Pros!

http://novapros.com/articles/featured/blending-decks-into-yards-and-landscapes/

The past twenty-five years has witnessed a phenomenal boom in the construction of big outdoor decks. Most of them are downright ugly. Many are unimaginative rectangles built with now-graying green lumber in a dull array of parallel lines. In an era of eight-foot privacy fences, plenty of homeowners don’t care how ordinary their backyard refuges might appear to the neighbors. Some of us, however, want to achieve a lovely flow from treated wood to lot-line woods, and wouldn’t dream of installing head-high solid blockades to hide our handiwork.

You can have your sprawling wooden deck, your table and chairs, the big umbrella, a giant $2,000 barbecue station, and even one of those hideous plastic weatherproof storage bins – you can have all this, and a beautiful backyard, too. Let the Jones’s next door stare all they want; theirs will be a look of admiration tinged with envy.


Shared via AddThis
_______________________________________________

See this story as it originally appeared on Helium.com

copyright 2008 - Jim Bessey

Saturday, September 12, 2009

Big tiles or small: which tiles are "just right" for your project?

What's more fun than doing a tile job? -- choosing the tile!

Shopping at tile stores is a sensory experience. So many shapes, sizes, textures, patterns and colors to choose from; it's enough to make you dizzy. At first it's easy:

"Love that! Love those! No way I'd use them!" But then comes, "-- oh, I like those, too. These would look great in our bathroom. So would these, over here."

6 x6 tile floor and white subway tile walls
And that's just in the first five minutes of browsing the tile displays. When you consider the combinations and permutations, there are actually more tile choices than there are paint colors at Sherwin-Williams. One way or another, you have to...

Narrow the field.

Most folks start with a color scheme and a budget. That cuts the possibilities by at least half. Still leaves a couple thousand potential selections. Move on to texture: smooth or "natural" surface? Glossy or matte finish? Now you're down to just a few hundred possible tiles.

Size matters.

Tiny, small, medium, large or giant -- which one feels just right to your eye? Many popular tile offerings are available in every size, from one-inch mosaics to 16" platters. That allows the tile manufacturer please a large range of customers. Let's ignore all those other options, and consider this question partly from the do-it-yourselfer's point of view.

Each tile size has a reason for its existence. Some trace their origins back to the Roman Baths and Ancient Greece. Other sizes were standardized during the post-war building boom. Still more were created to suit the appetites of modern mall builders, who wanted to cover larger areas with fewer tiles. The rest exist simply because they are aesthetically pleasing.

Here's the run-down:

  • Tiny tiles: Sheeted mosaics offer intriguing patterns of color and shape. They're easy to work with in most cases, because they require less difficult cutting. Typical sizes include one- and two-inch squares as well as similarly-sized octagons or hexagons. (The latter are more difficult to cut and fit.) Small tiles are often best for small spaces like kitchen counter top backsplashes or powder room floors, or for use as inset borders. In addition, web-mounted tiles allow the manufacturer to create intricate patterns that wouldn't work well with larger tiles.
  • "Subway tiles" (see photo) are usually glossy rectangles in a specific proportion: 2 to 1 or 3 to 1, as well as 5 to 3, are typical (but certainly not the only choices). These classic tiles make an elegant choice for traditional walls. Matching base coves, outside corners and edging ("bullnose") trims are usually available for each color and finish. Subway tiles are almost always ceramic -- lightweight, inexpensive, self-spacing, and easy to work with.
  • Until recently, builders have preferred ceramic squares in 4" or 6" sizes (see photo). They chose earth tones or elemental colors for more universal customer appeal. These "simple squares" are low-cost and easy to cut and install. They can be self-spacing or moved apart for larger grout lines, as desired. Generally, even non-stock colors can be ordered on short notice. Because the geometry is straight-forward, these tile sizes lend themselves to "checker-board" designs or "picture-framed" border layouts.
  • Larger rectangles offer a visual change-up from more familiar tile patterns. Standard sizes include 4 x 6, 6 x 8, and 8 x 10 (inches). These non-square tiles look great laid vertically, horizontally, and even in "brick"-style patterns. While ceramics are readily available, medium-sized tiles like this are more often displayed in porcelain lines. Porcelain tiles are heavier, more durable, less absorbent -- and harder to work with -- than standard ceramics. Installers will usually use tile spacers and cement-based "thin-set" mortar for best results.
  • Big tiles start at 12" square and go up from there. One popular size is 13.5" square, which probably converts to some whole number of centimeters. Paver-sized tiles were once reserved for large rooms, commanding foyers, malls, and restaurants. Now they are one of the top choices by designers for contemporary homes. Large and giant tiles are heavy, expensive, subject to shipping damage, and more difficult to install.
  • Preparation becomes critical as tile dimensions increase. DIY-level tile saws are often too small to accept these products for cutting. Layout can be tricky, to avoid weird edge-cuts and ungainly "L"s around corners. On the other hand, these (usually porcelain) tiles are incredibly durable, even for outdoor use. And they're gorgeous.
Which size is right for you? Consider room size, the level of complexity for layout (smaller tiles make layout easier, in general), and your skill level. In the end, your choice of tile size comes down to what "feels right" to you. Maybe you'll know it when you see it. When you consider all your options and choose the one that feels just right for you, you'll still be saying "I love it!" when the job is complete.

copyright 2009 - all rights reserved. Reprints available upon request.
_______________________________________________

For more information about tile floors and walls, have a look at the DIY Tile Zone in Betaville, at Helium.com. If you have questions or other feedback, please leave a comment here or on the tile zone.

Friday, July 03, 2009

How to install ceramic floor tiles next to wood flooring


Ceramic tile floors form a natural complement to hardwood floors. The trick lies in how you transition from tile to wood. Since the two materials are so dissimilar, they expand and contract at very different rates. You should never simply butt new tile to an existing wood floor, or vice-versa. Let's look at the two most common scenarios.

A. Your new tile floor will be nearly the same height as the existing wood floor:

This occurs fairly often, since hardwood floors are generally 3/4" thick. Floor tile is often best laid over 1/2" cement board; add tile that's about a quarter-inch thick, and the two floors will be nearly equal. In this case you'll need some sort of simple expansion joint. ...

Read the rest of this article...

... [and]

B. Your new tile floor will be significantly higher than the existing wood floor:

This happens quite often, given tile's requirement for heavy, solid underlayment. Many wood-slat floors, typically of oak, are only 3/8" thick. It's not at all advisable to lay tile to match this thickness -- you'd have to omit the underlayment entirely, not a good idea!

Another common reason for a tile floor that's higher than wood is that you'll be covering up a portion of an existing hardwood floor by laying tile over-top. This is done to create a traffic-friendly foyer area where your front door enters directly on a wood-floored room. ...

Read the rest of this article...

Conclusion:

With careful planning and attention to detail, you can allow your new tile floor to peacefully coexist with your original wood floor. Your transition will be strong and aesthetically pleasing, while it protects your new tile from edge damage. Done properly, your tile to wood transition will last as long as either of these highly durable materials, and look great the entire time.

copyright 2009 - all rights reserved Read Jim's profile at Helium.com
_______________________________________________

See this story as it appears on Helium.com

Saturday, June 06, 2009

Wooden planter set makes a fine deck accessory

two planters and a bench
Most decks are boring until you add some jazzy details. A pair of wooden planters with a connecting corner bench did the trick at my house.

My oldest son and I found ourselves with a free afternoon last year. We had a small stockpile of materials left over from a project my partner had done for one of his customers. I did some measuring and calculating, and we had enough for a small project.

We trekked off to our local Lowe's to buy two square plastic plant containers and a box of color-matched screws. When we returned, we assembled a few basic tools, drew up some very basic plans on graph paper, and went straight to work.

Now our plain-Jane deck has a nifty and practical corner. The hostas add a very nice touch of green, too. My wife likes the bench -- it's her favorite spot to set out her potted plants for sunning.

Want to build your own? Read more comprehensive instructions in my Helium article, "How to build a wooden planter." You can use the picture as a general guideline, too, of course.

copyright 2009 - all rights reserved    Read Jim's profile at Helium.com
_______________________________________________

Want to learn more? Head for Theresa and Raven's Container Gardening Zone to see a LOT more about turning your patio or deck into a paradise. 

If you have a project like this you'd like to share, please drop me a line.

Read about building planters on Helium.com

Tuesday, March 17, 2009

DIY Tile Pic of the Week: Find your tile niche

A custom tile niche evokes classic Roman charm in a bathroom.

custom tile niche When you choose tile for your bathtub or shower makeover, you might want to consider including a classic tile niche. This is not a project for the uninitiated! However, for design harmony and beauty, it's hard to beat.

The project shown used 12" by 12" porcelain tile, 3/8" thick -- not an easy tile to cut or install. Choosing a smaller, thinner ceramic tile reduces the level of difficulty significantly.

Typical "soapdish" accessories are single molded ceramic or "cultured marble" items that you purchase and install. This usually involves cutting two to six field tile (the standard tile used) to fit around the installed fixture. You might have to cut a hole in the wall and use some silicone caulk; but that's usually the extent of it.

As you can see from the image, a tile niche demands far more cutting, fitting, and finish (grouting) finesse. This fixture took the place of four 12 x 12 field tiles; each of these had to be carefully cut (last) to fit around the indented area. All tiles used in the niche follow the grout lines for the containing wall. Notice how critical the placement of the niche within the field tile is, in this case.

Add them up, then: there are 24 distinct cut tiles used in this installation. (That's more than 24 cuts, since some tile pieces required two cuts.) The picture-frame border you see was composed of bull-nosed edging tiles, with the eased edge facing inward. This prompted eight mitered cuts which had to be carefully fitted.

Grouting an inset tile fixture is more difficult than finishing around a protruding soapdish, too. More care has to be taken with the original fit and with the grouting itself, since every joint shows. This is not a place to be "off just a little"!

You might ask, "why bother with all this extra effort?" The answer appears just below the subhead for this post, and is worth a thousand more words.

DIY tile pic for week of Mar 16 2009

copyright 2009 - all rights reserved
_______________________________________________

See this photos like this featured along with all sorts of other related ceramic tile information and articles on the new DIY Tile Zone at Helium.com.

If you have a DIY tile pic that you'd like to share, please leave a Comment here. If I use your picture, I'll link to your blog or website. ~Jim

Sunday, February 22, 2009

DIY Tile Pic of the Week: Cottage backsplash

Nostalgic cottage-style tile backsplash uses "subway" tiles and more:

 
cottage tile backsplash in white and tan

This week's project was one that could indeed be completed by a DIYer on a weekend. It's a classic cottage design using "subway" tile (note the offset layout) in two sizes and colors.

The tan tile in 5 by 5 squares forms a visual 5" backsplash. The same color is reflected in the top band (cut to size on site). These tan tiles ground the wall area and frame the off-white subway tile mid-section, creating a three-dimensional effect.

See the small inset tiles in beige? Those are pears, apples, and grapes. This adds to the texture and depth of the stove's backdrop. Using fruit, rather than a more abstract design, makes for a homey feel. This is Gramma's Kitchen, for sure. (Literally, in this case.)

Later, the homeowner will paint the surrounding cabinets using both colors from the tile to follow-through with this theme. Since both hues are neutral, all sorts of bright-color possibilities are open for accessorizing.

At just under thirteen square feet, this job budgets at well under $1,000 and is easily completed in less than ten hours total work time (one weekend is best). Tools required include a wetsaw (rental widely available), and the proper size trowel (per adhesive manufacturer's instructions).

Notice how the mixture of three different tile sizes really makes this difference in this small job?

DIY tile pic for week of Feb 22 2009

copyright 2009 - all rights reserved
_______________________________________________

See this photos like this featured along with all sorts of other related ceramic tile information and articles on the new DIY Tile Zone at Helium.com.

If you have a DIY tile pic that you'd like to share, please leave a Comment here. If I use your picture, I'll link to your blog or website. ~Jim